Author
A soft spot near your RV’s bathroom might seem harmless at first. Maybe the floor gives a little when you step on it, or the vinyl has started lifting around the edges. These small changes can point to a much bigger problem underneath.
RV floors take a beating from changing temperatures, road vibrations, and moisture. Over time, even a minor leak can damage the plywood beneath your flooring. Once that happens, the problem rarely stays in one place.

If you’re considering Subfloor Replacement in Middletown, NY, understanding what causes floor damage and how repairs work can help you make the right decision before the problem gets worse.
This guide covers the warning signs, common causes, replacement process, material choices, and steps you can take to protect your RV.
What Is an RV Subfloor, and Why Does It Matter?
The subfloor is the structural layer beneath the finished flooring inside your RV. It supports people, furniture, cabinets, appliances, and other interior components.
Depending on the RV’s construction, the subfloor may consist of plywood, oriented strand board (OSB), composite panels, or a laminated flooring system.
The finished flooring, such as vinyl or laminate, sits above this structural layer.
When the subfloor is in good condition, it helps distribute weight and keeps the interior stable. When moisture weakens it, the floor may flex, sag, or lose its ability to support normal loads.
This is particularly important in RVs because the floor experiences movement that a residential floor usually doesn’t. Every turn, bump, and mile of highway travel places additional stress on the structure.
Ignoring subfloor damage can eventually affect cabinets, partitions, fixtures, and the connections between the floor and surrounding structure.
6 Warning Signs Your RV Subfloor May Need Replacement
Subfloor problems often develop slowly. Recognizing the early signs can prevent additional damage and make repairs more manageable.
1. Soft or spongy areas underfoot
A healthy RV floor should feel reasonably firm when you walk across it.
If certain sections feel soft, springy, or unstable, the material underneath may have weakened.
Pay particular attention to areas near the bathroom, kitchen, entry door, and exterior walls.
These locations are more likely to experience water exposure.
2. Discoloration around flooring edges
Dark stains, yellow patches, or unusual marks around the flooring can indicate moisture intrusion.
Discoloration doesn’t always mean the subfloor needs replacement, but it deserves investigation.
Water can travel beneath the finished flooring and damage areas far from the original leak.
3. Persistent musty odors
A musty smell that remains after cleaning and ventilation may indicate trapped moisture.
Wet wood and insulation can create conditions where mold grows, especially when the affected area stays damp.
The smell may become stronger after rainfall or during humid weather.
4. Cracked or lifting flooring
Vinyl, laminate, and other floor coverings can separate when the material underneath moves.
You may notice curled edges, gaps between planks, or flooring that no longer sits flat.
While adhesive failure can cause similar symptoms, underlying structural movement should be ruled out.
5. Sagging near cabinets or appliances
Heavy interior fixtures place continuous pressure on the floor.
If the subfloor begins weakening, these areas may settle unevenly.
Cabinet doors may stop aligning properly, or appliances may appear slightly tilted.
6. Visible moisture or water stains
Water stains around plumbing connections, windows, slide-outs, and entryways are important warning signs.
Even when the visible surface dries, moisture can remain trapped below.
A thorough inspection helps determine whether the damage is limited to the surface or extends into the structural layers.
What Causes RV Subfloor Damage?
Understanding the cause is essential because replacing damaged flooring without fixing the original problem can lead to another expensive repair.
Roof and window leaks
Damaged seals around roof vents, skylights, windows, and exterior joints allow rainwater to enter.
Water can travel through wall cavities before reaching the floor.
By the time a soft spot appears, the leak may have been present for months.
Plumbing problems
Loose fittings, cracked pipes, and leaking water connections can damage flooring beneath sinks, showers, and toilets.
Small leaks are particularly troublesome because they can remain hidden for long periods.
Poor exterior sealing
RV sealants deteriorate over time due to sunlight, temperature changes, and normal movement.
Gaps around doors, storage compartments, and exterior seams create opportunities for moisture intrusion.
Condensation and humidity
Condensation can accumulate in poorly ventilated spaces, particularly during cold weather.
Although condensation alone doesn’t always cause structural damage, persistent moisture can contribute to deterioration.
Age and normal wear
Older campers may have flooring materials that have endured decades of vibration, humidity, and repeated loading.
Existing repairs or modifications can also affect how well the floor performs.
Can You Repair an RV Subfloor Without Replacing It?
The answer depends on the extent of the damage.
A small, localized area may be repairable if the surrounding material remains sound and the underlying structure is intact.
For example, a technician may remove a damaged section, inspect the supporting structure, and install a replacement panel.
However, widespread deterioration often requires a more extensive approach.
RV Subfloor Repair may be sufficient when the damage is isolated, the moisture source has been eliminated, and the remaining floor can safely support the repaired section.
Replacement becomes more likely when:
- Multiple sections feel soft or unstable.
- Moisture has damaged a large portion of the flooring.
- Supporting structures show corrosion or deterioration.
- Previous repairs have failed.
- The floor no longer provides adequate structural support.
Some RVs use bonded or laminated floor assemblies. These require different repair methods from conventional plywood floors, and cutting into them without understanding their construction can create additional problems.
A professional inspection helps determine which approach is appropriate.
How Does the RV Subfloor Replacement Process Work?
Although the exact procedure varies by RV model, most replacement projects follow several important stages.
Step 1: Inspect the damaged area
The technician begins by identifying visible damage and checking surrounding areas for hidden moisture.
Moisture meters and other inspection methods can help locate affected materials.

The inspection should also identify the source of the leak.
Step 2: Remove the finished flooring
The damaged floor covering must be removed to expose the underlying material.
Depending on the repair location, cabinets, furniture, trim, or fixtures may also need temporary removal.
This stage reveals the actual condition of the subfloor.
Step 3: Evaluate structural components
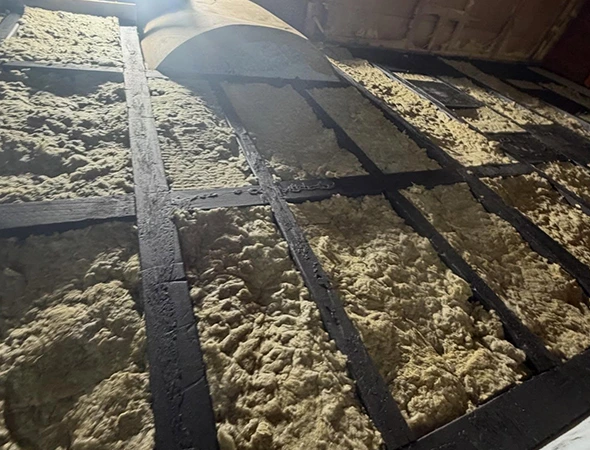
Once the floor is exposed, the technician checks the supporting frame, insulation, and adjacent materials.
Metal components may need corrosion treatment, while damaged wood supports may require replacement or reinforcement.
Any structural repair must account for the RV manufacturer’s construction requirements.
Step 4: Remove compromised material
Damaged subfloor sections are carefully removed.
The technician must avoid cutting electrical wiring, plumbing, tanks, or other components located beneath the floor.
Remaining materials should be evaluated for moisture and deterioration before reconstruction begins.
Step 5: Install replacement materials
New panels are selected based on the vehicle’s construction, required strength, thickness, and exposure conditions.
Proper fastening, support, and alignment are important for preventing movement.
Where applicable, the technician also restores insulation and moisture protection.
Step 6: Reinstall the finished flooring
Once the structural layer is secure, the finished floor can be installed.
Trim, fixtures, and other removed components are returned to their original positions.
The completed repair should be checked for firmness, alignment, and proper operation of nearby fixtures.
Which Materials Are Best for RV Subfloor Replacement?
Material selection can affect durability, weight, moisture resistance, and long-term performance.
| Material | Advantages | Considerations |
| Exterior-grade plywood | Strong, widely available, and relatively easy to work with | Requires protection from persistent moisture |
| Marine-grade plywood | Durable construction and suitable for demanding moisture-exposure applications | Typically more expensive |
| Composite panels | Some products offer excellent moisture resistance | Structural suitability varies by product |
| OSB | Cost-effective and commonly used in certain factory assemblies | Prolonged moisture exposure can cause swelling |
There is no universal best material for every RV.
A replacement panel must be compatible with the original floor assembly. Thickness, weight, fastening requirements, and structural properties all matter.
Marine-grade plywood, for example, is not automatically waterproof. It still needs appropriate protection from water intrusion.
The right choice is the material that meets the vehicle’s structural needs and can be installed correctly.
How Much Does RV Subfloor Replacement Cost?
Subfloor replacement costs vary considerably because two RVs with similar visible damage may require very different repairs.
A small damaged section near an entryway is generally less involved than a floor replacement extending beneath cabinets, plumbing fixtures, and interior walls.
Several factors influence the estimate.
Size of the damaged area: Larger repairs require more material and labor.
Accessibility: Flooring beneath fixed furniture or appliances can take longer to reach.
Structural damage: Corroded supports or deteriorated framing add complexity.
Material selection: Specialty panels and compatible replacement materials can affect pricing.
Water damage remediation: Leak repairs, drying, and removal of damaged insulation may be necessary.
RV construction: Laminated floors and certain trailer designs require specialized repair techniques.
Before approving work, request an estimate that explains the inspection findings, proposed repairs, materials, and any conditions that could change the final price.
How to Prevent Future RV Subfloor Damage
Preventive maintenance is usually less expensive than repairing extensive water damage.
Start with regular inspections of the roof, windows, doors, and exterior seams.
Look for cracked sealant, loose trim, staining, or evidence of water entering around fixtures.
Check plumbing connections periodically, especially after winter storage or long trips.
Keep interior spaces ventilated to reduce persistent condensation. If your RV is stored for extended periods, inspect it after heavy rainfall and before returning it to regular use.
Avoid covering unexplained soft spots with additional flooring. That can hide the symptoms while the underlying problem continues.
Finally, document repairs and inspections. A maintenance history can help identify recurring leaks and make future troubleshooting easier.
Choosing a Professional for RV Subfloor Work
Finding a technician familiar with RV construction is important because these vehicles differ significantly from residential buildings.
Ask whether the repair provider has experience with your RV type and flooring system.
A reliable assessment should address the moisture source, structural condition, replacement materials, and scope of work.
For owners considering Subfloor Replacement in Middletown, NY, Hudson Automotive Repair & Service provides RV and Airstream structural repair services, including subfloor replacement and related restoration work.
The company operates from Highland, NY, and serves surrounding communities. Contacting the team with your RV model, photographs, and a description of the damage can help begin the evaluation process.
Frequently Asked Questions
How long does RV subfloor replacement take?
A small localized repair may take considerably less time than a full floor reconstruction. The schedule depends on damage, drying requirements, material availability, and whether fixtures must be removed.
Can a wet RV subfloor dry without being replaced?
Sometimes, if the material remains structurally sound and the moisture source is corrected. However, swollen, rotted, or delaminated materials may not regain their original strength after drying.
Is it safe to use an RV with a soft floor?
It depends on the location and severity of the damage. A soft floor may indicate reduced structural support. Avoid loading or walking on an unstable section until it has been evaluated.
Does insurance cover RV subfloor damage?
Coverage depends on the policy and the cause of the damage. Sudden covered incidents may be treated differently from gradual leaks, deterioration, or neglected maintenance.
Can damaged RV flooring cause mold problems?
Yes. Persistent moisture can create conditions for mold growth in flooring, insulation, and adjacent materials. Correcting the water source and removing affected materials may be necessary.
Conclusion
A damaged RV subfloor deserves attention before it becomes a larger structural problem.
Soft spots, musty odors, lifting flooring, and recurring moisture are all reasons to investigate what is happening beneath the surface.
The most effective repair addresses both the damaged material and the source of moisture. Whether the solution involves a localized repair or a larger replacement, proper inspection and material selection are essential.
If your camper is showing signs of floor deterioration, Hudson Automotive Repair & Service can help evaluate the condition and discuss suitable repair options.